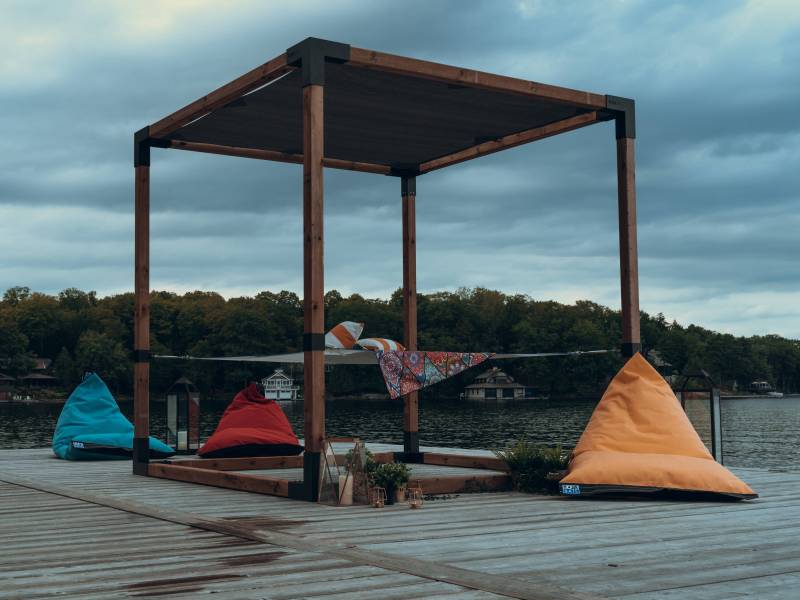
Pergola Hammock – Hello and happy summer! Outdoor projects are in the works at Tree House and we just built this pergola hammock stand/outdoor projector screen. (That’s a title.) This was such a fun project that came together beautifully thanks to our sponsor, Simpson Strong-Tie, and their amazing line of outdoor accent equipment.
The first thing we have to do is call 811 to make sure there are no utility lines or cables running underground where we will have to dig to erect the posts. The utility companies came, marked the location of the cable, which was nowhere near where we were going to dig, so we were in the loop. Depending on your local codes, you may need to get a permit to build a structure like this.
Pergola Hammock

Simpson Strong-Tie recently created a free web-based pergola planning software that allows you to design and customize your dream pergola or pavilion. It takes all the guesswork out, ensuring your system is robust, secure, and performing well. It also has a materials list, submission page, and dealer locator so you can plan, design, gather materials, and get home. Check it out here.
Brazilian Polyester Hammock
We plotted the placement of the 6×6 posts by placing hammocks on the ground and round-eye shaped objects. Our hammock is 12 feet long, so we decided that the poles should be about 13 feet apart. This is the hammock for 2 people we bought. We borrowed a fortune teller from our good friend Josh and Adam had to dig. He dug down about 2 feet and created a hole about 10 centimeters in diameter. He then poured some paver base onto the bottom and pressed it down.

Next, we dropped the posts into the hole and used a level to make sure it was level and vertical. We then used some scrap 2x4s and dividers to brace the posts into place so we could pour the concrete. We mixed dry concrete down the hole and added a little water and mixed it around until it was the consistency of peanut butter. You can also mix the concrete with a wheelbarrow, which we’ve done before, but we think this method might take longer. I’m not sure if it works or not, but either way, it does. The concrete will then cure for several days.
When setting up the posts, we have to make sure that they both face the same direction – that is, one side does not go in a different direction. The sides of the 6x6s are so symmetrical that when the beams are attached on top, everything lies flat and even. We used pressure-treated wood for this project and it wouldn’t have been priced right, but since wood prices are so high these days, we ended up paying about $600 for the wood (ouch! ).

Big Kahuna 10×12 Pergola Kit
Once the concrete was poured, we had to cut out the trellis sections. For the lights, we used a few 16-foot 2×12 boards. We first cut them to length with my chain saw and then started cutting the grooves. I like how this design has notches in both the beams and rafters so everything fits together like a puzzle. We tie the bundles together so that when cut, the grooves will line up. We measured and marked, spaced levels evenly along the length of the board, and used a hand saw to make some cuts. Then we just need to take out the debris and clean the cut with a chisel. This part is super satisfying and fun. Whichever circular saw you use, make sure it’s large enough to make these deep cuts.
Next, we cut the 2×12 rafters to length and glued them all together so we could cut all the grooves at once. Not only will this make our work more efficient, but our cuts will also be more precise. Remember to wear a dust mask because this pressure treated stuff is nasty! Now that the grooves are cut, use the chisel to remove the pieces – so that the cutting sound is satisfactory.

To cut curves on beams and beams I use a stirrer. I’m glad this information was added because it makes the whole system better. Once the first section is cut, I can use it as a template for the rest of the rafters. Lather, rinse, repeat, etc. Then I just sanded the edges smooth. FYI: This type of truss design is called the Roosevelt Step. This model is also in the plans – you’re welcome! I want you to build this pergola hammock and tag me on social media (@) so I can see your creation!
Make Your Own Hammock Pergola!
If you’ve seen any of my other outdoor projects, you know that I love, love, love the Outdoor Accents hardware line by Simpson Strong-Tie – these black powder-coated ties really help create outdoor accents like this are SO easy, super sturdy, and SO pretty. Check out the pavilion built in two days. And a floating deck and canopy were built for a military family a few summers ago.

Once the concrete has set around the posts, it’s time to trim the height of the posts. We measured a post 8 feet high and marked it, then tied a string from one post to the other, we put a level on top of that post to make sure the other post would be level and even, and we marked. Since the floor was uneven, we had to cut the posts to different lengths to get everything to fit. We used a circular saw to make those cuts, but you can also use a miter saw or even a chainsaw if you prefer. In one of the articles, we had to take out a repeater because the ratio measurement didn’t cut it all the way.
We’ve finished cutting the beams and rafters, now it’s time to cut the corner braces. These are also 6×6, just like the posts. Adam first used a reciprocating saw to cut a 45° angle on each end, but found it too long so he switched to a circular saw to try to speed up the process and eventually ended up with a sweep saw. At first he wanted to use a chainsaw because it would be faster, but I agreed – I didn’t have much faith in the power of his chainsaw. But he proved me wrong – he cut it and it was right.

New! Mountain Cabin
Because there are curves in the beams and rafters, I wanted the joists to match that shape, but as a result, I didn’t have any tools in my shop to make these cuts on a 6×6 safely even if Adam is a chainsaw master. I met my friend and colleague Bob from I Like To Make Stuff and he offered his circular saw for this. We took a fun field trip to the staff’s I Love To Make Stuff workshop, where Bob gave me a crash course in how to use a bandsaw! Maybe cutting a 6×6 post isn’t the best bandsaw project for a beginner like me, but we did it with all our fingers intact. I’m so grateful to have Bob’s help!
Before assembling the pergola hammock stand, I stained the parts with an exterior stain. I wanted a dull color to fill our house. I just rinsed it off and let it dry – just one coat. I would have quickly used the sprayer, but was too lazy to do all the necessary prep work and setup. After a few hours of mulling over this ending, I regretted that decision. Now I might have carpal tunnel. Perfect.

Now it’s time for the fun part: assembly! The meeting will take place very quickly. We were able to put this together in a few hours. We measured the height of the Strong-Tie connections and screwed them in. Structural wood screws and hex head washers look like a locked connection but installation is as easy as turning a screw. I also like its chunky look. Not only are these ties beautiful, but they’re also structured! This is the Tie Joist Deck from the Works Collection. They are heavy duty, strong, structured and gorgeous. And you don’t need to drill before using structural wood screws which saves time and effort. We nailed the beam-to-post connections and set the beams in place, then secured them with more structural screws and hex head washers.
Brazilian Sunbrella® Hammock
Next is the problem of installing the rafters into each groove. Most of these went in without a problem, but there were a few places where we had to lengthen the shaft to get to the rafters. Adam did this with a changed vision. Then we added 90-degree corners for added security.

Finally, we attached the braces with wood screws of similar texture and hexagonal shape.
Diy hammock pergola, hammock pergola plans, hammock under pergola, multiple hammock pergola, hammock on pergola, hammock in pergola, pergola hammock stand, hammock chair pergola, pergola and hammock, hammock pergola kit, hammock pergola, hammock swing pergola
Leave a Reply